Thursday, 13 August 2026

Optimizely XML Resource Builder: A Visual Studio Extension for Language Resource Files

Anyone who has worked on a larger Optimizely solution will know the feeling. You add or update a page type, block type, or shared base class, and then need to keep the language resource XML in sync. It is not difficult work, but it is repetitive, easy to miss, and becomes more painful as the number of content types grows.

This started as a small pet project for my own convenience. I wanted a quick way to generate a starting point for Optimizely language resource files directly from the content type code already in a project. Once it was useful in day-to-day work, I thought it could also benefit the wider Optimizely community if I packaged it properly and made it publicly available.

That is where Optimizely XML Resource Builder came from.

What it does

Optimizely XML Resource Builder is a Visual Studio extension that scans the project you select and generates an Optimizely language resource file from its C# content type definitions.

It reads content type attributes such as ContentType and SiteContentType, then creates the XML entries for the content type name, description, properties, captions, and help text.

The default output is:

Resources\Translations\ContentTypes-en.xml

You can change both the language code and output folder from the extension dialog.

Why I built it

Language resource files are useful for keeping the Optimizely editor UI clean and consistent, especially when you are working across several languages. The challenge is that the information is usually already present in code:

[ContentType(DisplayName = "Article Page")]
public class ArticlePage : SitePageData
{
    [Display(Name = "Heading", Description = "The main page heading")]
    public virtual string Heading { get; set; }
}

Copying those values into XML by hand adds another maintenance step. The extension uses the information already available in the attributes and gives you a generated file to review, commit, and translate.

Key features

  • Project-level command: right-click an Optimizely project in Solution Explorer to generate the resource XML.
  • Flexible content type detection: scan for SiteContentType, ContentType, or any additional attributes you configure.
  • Configurable generation dialog: choose a comma-separated attribute list, language code, excluded property prefixes, and output folder before generating the file.
  • Caption casing control: keep the original display-name case or convert captions to sentence case while preserving uppercase acronyms.
  • Overwrite control: choose whether to replace the existing XML file or safely add only missing entries.
  • Useful XML generated from code: create content type names, descriptions, property captions, and help text from the attributes already defined in C#.
  • Shared base-class support: find properties on custom base classes and add them under icontentdata.
  • Safe updates: add only missing XML entries by default, preserving existing translations and custom values. Enable overwrite only when you want a fresh file.
  • Solution-specific preferences: save settings per solution, rather than using one global set of values across every project.

How to use it

  1. Install the extension.
  2. Open an Optimizely solution in Visual Studio.
  3. In Solution Explorer, right-click the project that contains the content type classes.
  4. Select Build Optimizely XML Resource File.
  5. Set the attribute list, language code, output folder, and any exclusions.
  6. Select OK.

If no matching content types are found, the extension shows a warning and does not create an empty XML file.

Example output

<contenttypes>
  <icontentdata>
    <properties>
      <metadescription>
        <caption>Meta description</caption>
      </metadescription>
    </properties>
  </icontentdata>
  <articlepage>
    <name>Article Page</name>
    <properties>
      <heading>
        <caption>Heading</caption>
        <help>The main page heading</help>
      </heading>
    </properties>
  </articlepage>
</contenttypes>

Compatibility

The extension supports Visual Studio 2022 and later.

Links

I hope it saves other Optimizely developers the same repetitive work it saves me. If you try it, feedback and contributions are very welcome.

August 13, 2026

Tuesday, 3 March 2026

OpenAI-Driven AI Assistant for TinyMCE in Optimizely CMS 12

The Tiny.AI add-on enhances Optimizely CMS 12 by seamlessly integrating OpenAI directly into the TinyMCE editor. It empowers editors to rewrite, improve, summarize, expand, or translate selected content without leaving the CMS. Instead of copying content into external AI tools and risking formatting issues, Tiny.AI processes HTML safely and returns clean, CMS-ready output.

Installation

The command below will install the add-on in your Optimizely project.

dotnet add package A2Z.Optimizely.Tiny.AI

Configuration

Add your OpenAI configuration inside appsettings.json. The model value below is an example and can be updated to a supported model that fits your setup.

{
  "OpenAI": {
    "ApiKey": "YOUR_API_KEY",
    "Model": "gpt-4o-mini"
  }
}

The module automatically registers required services, the API controller, and the TinyMCE plugin.

Service Registration

The package registers the OpenAI service, circuit breaker, and authorization services automatically through an initialization module.

[ModuleDependency(typeof(InitializationModule))]
public class AiInitialization : IConfigurableModule
{
    public void ConfigureContainer(ServiceConfigurationContext context)
    {
        context.Services.AddHttpClient<IOpenAiService, OpenAiService>();
        context.Services.AddSingleton<EditorAuthorizationService>();
        context.Services.AddSingleton<SimpleCircuitBreaker>();
    }
}

Usage

Once installed and configured, editors will see a new AI Assistant button inside the TinyMCE toolbar.

TinyAI Icon

How it works:

  1. Select content inside the TinyMCE editor.
  2. Click the AI Assistant button.

  3. Choose an action (Rewrite, Improve, Summarize, Expand, Translate).

  4. Optionally specify a language.
  5. Apply changes and the HTML is replaced instantly.

The AI processes the selected HTML and returns valid HTML only, preserving links and formatting.

Security

Access to Tiny.AI is restricted to users in the following roles:

  • CmsEditors
  • Administrators

Authorization is validated server-side to ensure only permitted users can invoke AI functionality.

Resilience & Performance

Tiny.AI is built for production environments and includes:

  • Retry logic for transient API failures
  • Exponential backoff for rate limiting (429 responses)
  • Circuit breaker protection after repeated failures
  • Structured logging for monitoring
  • Token usage tracking
  • Estimated cost calculation per request

If multiple consecutive failures occur, the circuit breaker temporarily disables AI calls to protect system stability.

Cost Transparency

Each request returns:

  • Prompt tokens
  • Completion tokens
  • Total tokens
  • Estimated cost

This provides visibility into AI usage and allows teams to monitor spending effectively.

API Endpoint

POST /api/editor/ai/action

Example request:

{
  "action": "rewrite",
  "html": "<p>Some content</p>",
  "language": "en"
}

Example response:

{
  "html": "<p>Rewritten content...</p>",
  "tokens": 512,
  "cost": 0.0003
}

Compatibility

Tiny.AI currently supports Optimizely CMS 12 only. Check the GitHub repository or package page for the latest updates and version support.

Why Tiny.AI?

AI is becoming an essential productivity tool for content teams. Tiny.AI integrates OpenAI directly into Optimizely CMS workflows while maintaining security, HTML integrity, and operational resilience.

It eliminates the need for external tools and keeps the editorial workflow fast, clean, and fully integrated.

You can access the code and documentation for Tiny.AI on its GitHub repository.

March 03, 2026

Thursday, 12 February 2026

Advanced Form Submissions for Optimizely CMS

Advanced Form Submissions is an alternative submissions dashboard for Optimizely CMS 12 built for teams that need better control over Optimizely Forms data. It improves the default submission view with stronger filtering, export tools, bulk actions, and a more practical review experience for editors and administrators.

In larger Optimizely solutions, form data quickly becomes harder to manage across multiple sites, languages, and forms. This add-on gives teams a faster and more flexible way to review submissions without relying on the default interface alone.

Why use Advanced Form Submissions

  • Filter submissions by site, language, and form.
  • Search across submission content and apply date range filters.
  • Export filtered data as CSV, XML, or JSON.
  • Delete submissions more efficiently.
  • Open the original form directly from the dashboard.
  • Preview a submission on the original page with form hydration.

Key features

Personalized dashboard

The dashboard is designed for day-to-day editorial use and supports a more flexible review workflow.

  • Reorder columns to fit your needs.
  • Hide fields that are not useful for your review process.
  • Save settings per user, form, and language.
  • Use paged data loading for better performance on large datasets.

Advanced filtering and search

Submissions can be narrowed down quickly with filters for site, language, and form, plus free-text search and from/to date filtering.

Export and management tools

  • Export filtered submissions as CSV, XML, or JSON.
  • Delete selected or filtered submissions.
  • Jump directly to the related Form Container Block in CMS.

Better data display

  • File upload values are shown as clickable links.
  • Selection fields such as checkboxes, radio buttons, and dropdowns are rendered more clearly during review.

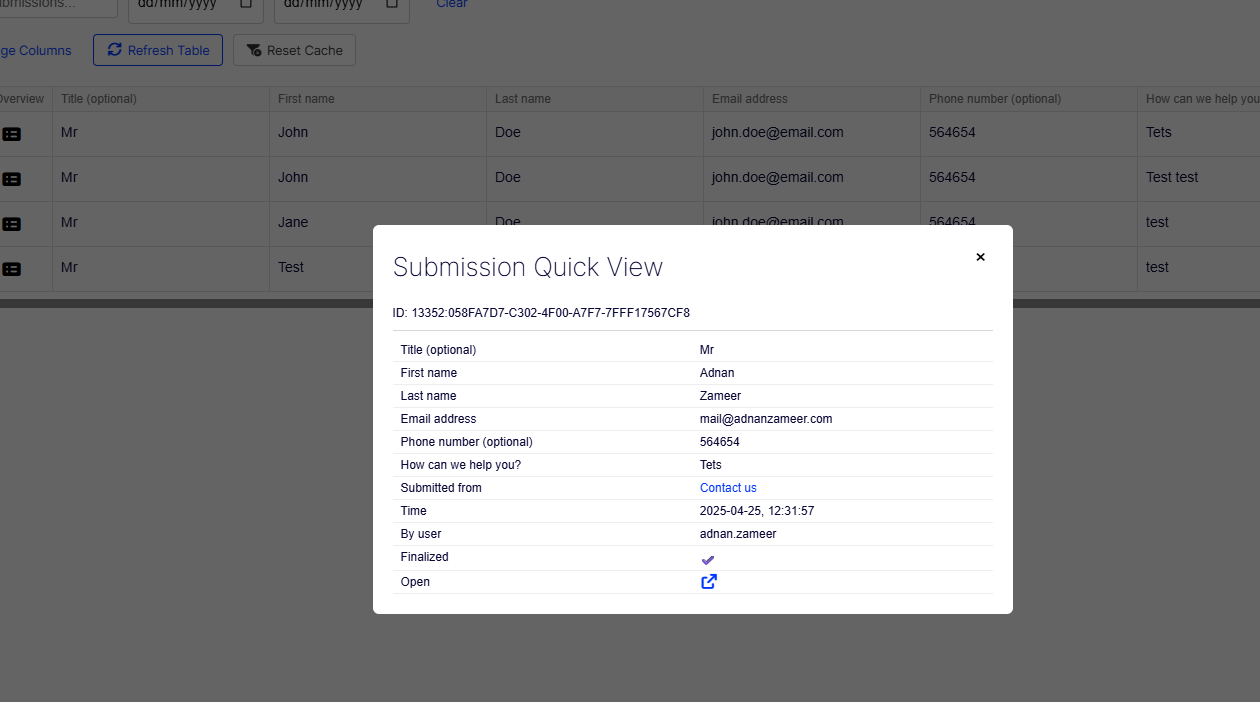
Quick view of an Optimizely form submission in Advanced Form Submissions

View submission on page

The add-on supports form hydration, which lets authorized users open a submitted form directly on the original page with the submitted values prefilled.

  • Open a submission in its original page context.
  • Review how the form looked when it was submitted.
  • Keep the workflow permission-aware and security-aware.

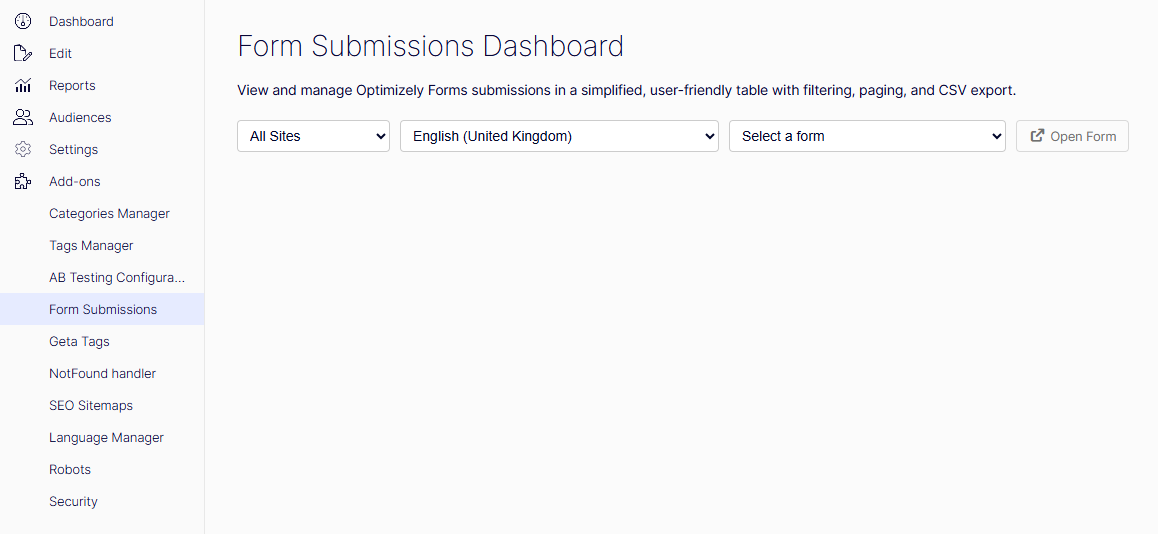
Advanced Form Submissions dashboard in Optimizely CMS

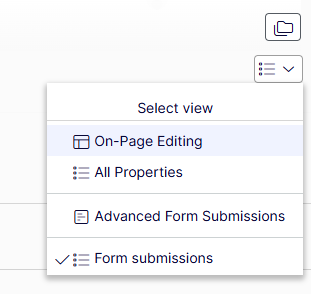
Advanced Form Submissions access from the Optimizely CMS form block

How to access it

The dashboard is available in two ways:

  • From the CMS global menu as Form Submissions.
  • From a Form Container Block through the custom Advanced Form Submissions view.

Installation

Install the package from the Optimizely NuGet feed:

dotnet add package A2Z.Optimizely.AdvancedFormSubmissions

Register the add-on during application startup:

using AdvancedFormSubmissions;

builder.Services.AddAdvancedFormSubmissions();

This registration adds the module, protected resources, CMS integration, and the default authorization policy.

Authorization and security

The add-on uses a dedicated authorization policy: form:submissions.

By default, access is granted to:

  • CmsAdmins
  • WebAdmins
  • Administrators

The same policy protects menu visibility, dashboard access, and form hydration behavior.

Compatibility

As of July 24, 2026, this add-on supports Optimizely CMS 12.

Limitations

Encrypted Optimizely Forms fields are intentionally not supported for dashboard display or hydration.

  • Encrypted values cannot be read through public APIs.
  • Encrypted fields are not hydrated on the front end.
  • Exports may show empty or masked values for encrypted fields.

Links

GitHub repository
README
NuGet package

FAQ

Does this replace Optimizely Forms?
No. It improves how submissions are reviewed and managed after forms are submitted.

Can editors preview submissions on the original page?
Yes. Authorized users can use form hydration to open a submitted form in its original page context.

Does it support encrypted fields?
No. Encrypted fields are intentionally excluded from hydration and display.

February 12, 2026

Wednesday, 24 September 2025

Master Language Switcher for Optimizely CMS

Master Language Switcher is an admin tool for Optimizely CMS 12 and 13 that helps teams change the master language of multilingual content more safely. It is designed for cases where you need to promote an existing language branch or convert the current master language to a new target language without manually working through content item by item.

For multilingual Optimizely solutions, this can save a significant amount of time and reduce the risk of mistakes when working across large content trees.

Why use Master Language Switcher

  • Switch - If the target language branch already exists, it becomes the new master language.
  • Convert - If the target branch does not exist, the current master language is converted and promoted to the target language.
  • Batch processing - Large content trees are processed in smaller batches for more controlled execution.
  • Clear feedback - Editors and administrators can review item-by-item results directly in the UI.

Supported content types

The tool can process the following content:

  • Pages - The selected root page and, optionally, its descendants.
  • Blocks - Blocks used inside page content areas.
  • Media - Media items when selected as the root or included through recursive hierarchy processing.

Important considerations

Important:
  • This tool updates content at database level and bypasses normal CMS editing safeguards.
  • Large operations may cause timeouts or database locks.
  • Run it during off-peak hours and always take a database backup first.
  • If changes do not appear immediately, clear any CDN or application cache and restart the site if needed.
  • If you use Optimizely Search & Navigation, reindex the content after the operation so search reflects the new master language.

Installation

Install the package from the Optimizely NuGet feed with:

dotnet add package A2Z.Optimizely.MasterLanguageSwitcher

How to use it

  1. Go to Admin > Tools > Master Language Switcher.
  2. Select the page or content root you want to process.
  3. Choose the target language.
  4. Optionally enable recursive processing to include child content.
  5. Click Change Language and review the live results in the UI.

Result feedback

The tool shows a clear results table after execution:

  • Each page, block, and media item is listed with its action and status.
  • Rows make it easier to spot switched, converted, skipped, or failed items.
  • A summary section shows totals for each result type.

Compatibility

This tool supports Optimizely CMS 12 and CMS 13. Check the package page and GitHub repository for the latest version details and updates.

Links

GitHub repository
NuGet package

FAQ

What is the difference between switch and convert?
Switch promotes an existing target language branch to master. Convert changes the current master language to the selected target language when that target branch does not already exist.

Is this safe for large trees?
It is designed to handle larger operations in batches, but you should still run it carefully, during quieter periods, and only after taking a backup.

Do I need to reindex after running it?
Yes, if you use Optimizely Search & Navigation, reindexing is recommended after the master language changes.

September 24, 2025

Friday, 19 April 2024

Mailchimp Marketing Automation Connector for Optimizely Forms

The A2Z.EPiServer.MarketingAutomationIntegration.Mailchimp add-on connects Optimizely Forms directly to Mailchimp so teams can send form submissions into mailing lists without relying on embedded Mailchimp forms. It gives developers and marketers a cleaner way to manage audience capture and marketing automation inside the Optimizely editing workflow.

This add-on is especially useful when you want editors to keep using Optimizely Forms while still pushing data into Mailchimp lists and interests through the Mailchimp API.

Note: This add-on draws inspiration from a blog post by Joshua Folkerts.

Why use this connector

  • Keep using Optimizely Forms instead of switching to embedded Mailchimp forms.
  • Map form fields directly to Mailchimp audience fields.
  • Support required and optional Mailchimp interests.
  • Give editors a simpler workflow for audience capture and list mapping.

Installation

Install the package in your Optimizely CMS project with:

dotnet add package A2Z.EPiServer.MarketingAutomationIntegration.Mailchimp

Configuration

Add the Mailchimp integration in Startup.cs inside ConfigureServices:

public void ConfigureServices(IServiceCollection services)
{
    services.AddMarketingAutomationMailchimp(o =>
    {
        o.MailChimpApiKey = "ApiKey";
        o.RequiredInterests = new List<string> { "b5423646b8", "f24a1b729b" };
        o.OptionalInterests = new List<OptionalInterest>
        {
            new()
            {
                Key = "Alloy News",
                Value = "a5423146b8"
            },
            new()
            {
                Key = "Alloy Announcements",
                Value = "d24e1f719b"
            }
        };
    });
}

You can also configure the add-on in appsettings.json:

"A2Z": {
  "AddMarketingAutomationMailchimp": {
    "MailChimpApiKey": "ApiKey",
    "RequiredInterests": ["a5423146b8", "d24e1f719b"],
    "OptionalInterests": [
      {
        "Key": "Alloy News",
        "Value": "a5423146b8"
      },
      {
        "Key": "Alloy Announcements",
        "Value": "d24e1f719b"
      }
    ]
  }
}

If the same settings exist in both places, the values in appsettings.json take precedence.

Scheduled job for caching

The package includes a scheduled job called [A2Z] Mailchimp Cache Manager. Its purpose is to preload Mailchimp lists and fields so editors do not experience the initial delay that can happen when data is fetched on demand for the first time.

This scheduled job improves the editor experience by caching Mailchimp data in advance, making form setup faster and smoother.

How editors use it

Start by creating a form in Optimizely Forms. In this example, the form contains three text fields: First Name, Last Name, and Email Address.

Example Optimizely form used with the Mailchimp connector

Editors will then see a new Mappings tab inside the form container block, where they can connect the form to a Mailchimp list.

Mailchimp list selection inside the Optimizely form mapping tab

After selecting a Mailchimp list, editors can map Optimizely form fields to the corresponding Mailchimp fields.

Field mapping between Optimizely Forms and Mailchimp fields

Mailchimp requires an Email field, so that field must always be mapped correctly. In most cases, you will also map fields such as first name and last name depending on the list setup.

Working with interests

Mailchimp interests cannot be mapped like normal text fields. They are designed to work with Multiple or single choice form elements in Optimizely Forms.

Mailchimp interest configuration in the Optimizely connector

Interest values such as d24e1f719b come from Mailchimp and can be configured as either Required or Optional.

  • Required interests are sent with every form submission.
  • Optional interests are sent only when the visitor selects the related option in the form.

Optional and required Mailchimp interest field setup

Compatibility

This add-on currently supports Optimizely CMS 12. Check the package page or GitHub repository for the latest updates and version support.

When this is useful

  • When you want to keep using Optimizely Forms instead of external Mailchimp forms.
  • When marketers need form submissions pushed directly into Mailchimp audiences.
  • When editors need a simpler way to connect forms to lists and interests.
  • When performance matters and cached Mailchimp metadata improves the setup experience.

Links

Full documentation and source code:

GitHub repository

NuGet package

FAQ

Does this replace Optimizely Forms?
No. It extends Optimizely Forms by sending submissions to Mailchimp.

Do editors need to map fields manually?
Yes. Editors select the Mailchimp list and map Optimizely form fields to the matching Mailchimp fields.

Does it support Mailchimp interests?
Yes. The connector supports both required and optional interests.

April 19, 2024

Thursday, 18 April 2024

Visitor Groups Usage Report for Optimizely CMS

This add-on helps Optimizely teams audit how Visitor Groups are used across the site so editors, marketers, and developers can review personalization rules with more confidence. Instead of guessing which groups are still active, you can quickly see where they are used and make better decisions around cleanup, optimization, and content targeting.

Originally, I wanted this to appear alongside Optimizely's built-in reports. In CMS 12, that is no longer possible because the GuiPlugIn attribute was removed, so I built it as a dedicated add-on with its own menu entry.

Why this report matters

Visitor Groups often grow over time and become difficult to track, especially across larger Optimizely solutions. This report gives you clearer visibility into where groups are being used, helping teams review personalization rules before changing or removing them.

  • See where Visitor Groups are used across site content.
  • Review personalization rules before cleanup or restructuring.
  • Support safer maintenance of older Optimizely solutions.
  • Give editors and admins better visibility into targeting setup.

Installation

Install the package in your Optimizely CMS project with:

dotnet add package A2Z.VisitorGroupsUsage

How to use it

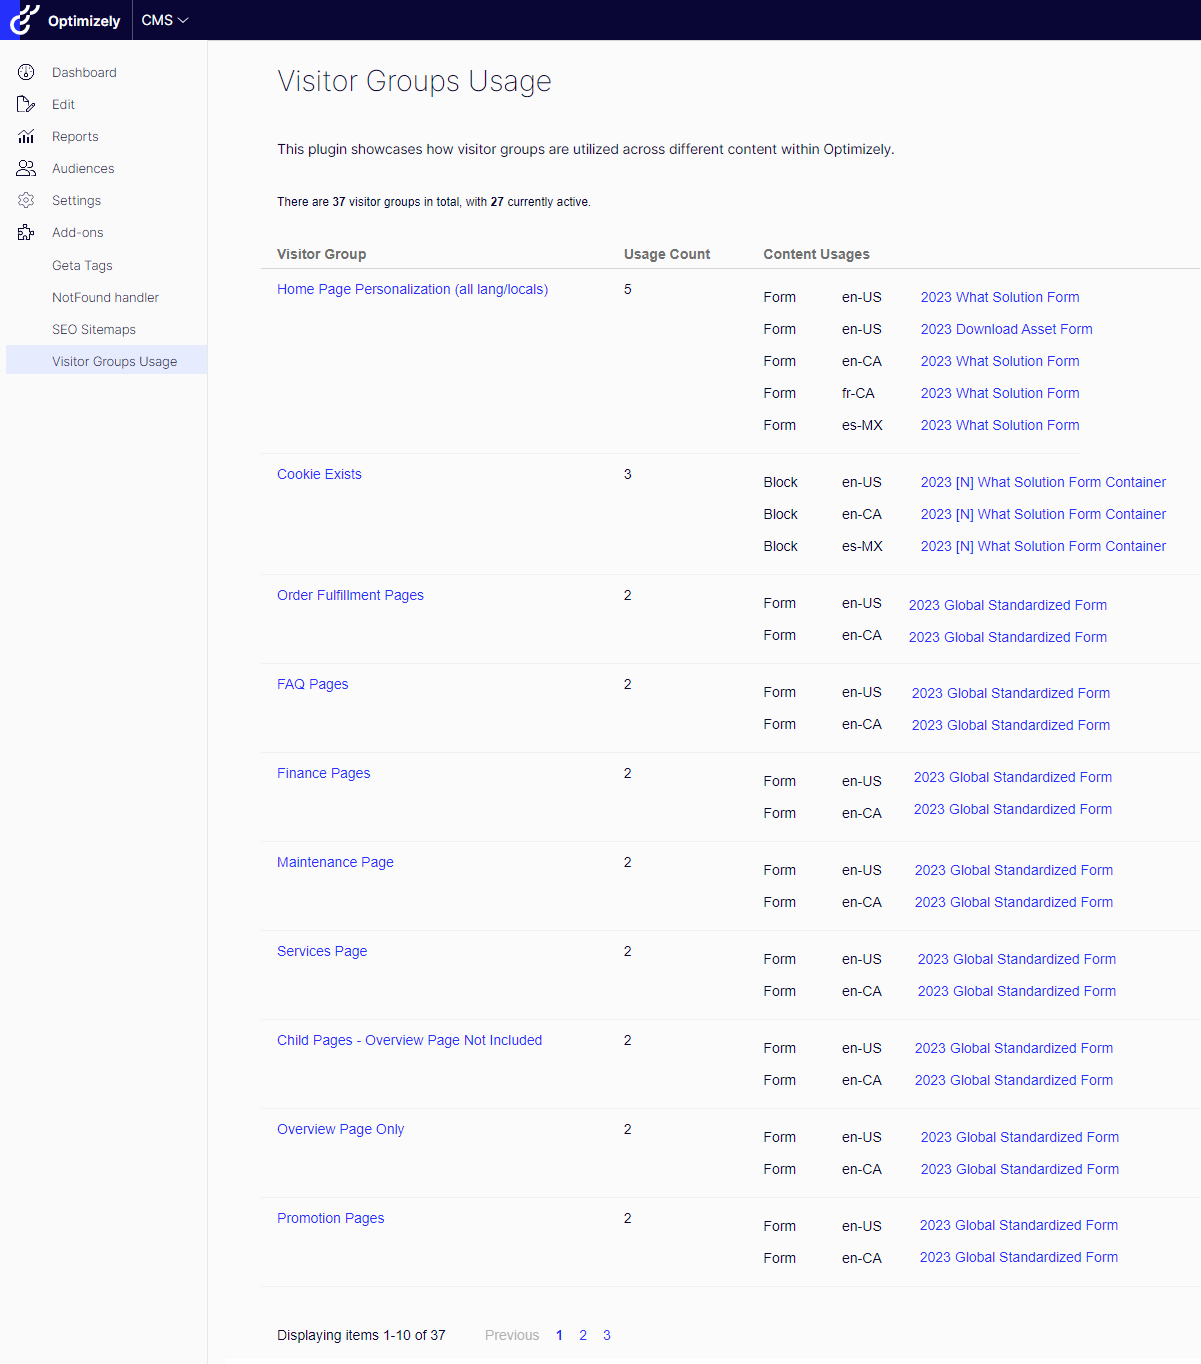
After installation, open Add-ons > Visitor Groups Usage in the Optimizely admin interface to access the report.

Visitor Groups Usage report in Optimizely CMS

Typical use cases

  • Audit old or unused Visitor Groups before cleanup.
  • Validate where personalization is active across content.
  • Support content reviews during optimization or migration work.
  • Help editors and developers align on how targeting is being used.

Compatibility

This add-on is available for Optimizely CMS 12 and CMS 13. Check the package page or GitHub repository for the latest version details, installation steps, and updates.

Links

Full documentation and source code:

GitHub repository

NuGet package

FAQ

Does this replace Optimizely's built-in reports?
No. It adds a dedicated report page focused specifically on Visitor Group usage.

Who is this useful for?
It is useful for editors, marketers, administrators, and developers who maintain personalization across an Optimizely site.

April 18, 2024

Thursday, 11 April 2024

Plugin for Identifying and Bulk Deleting Orphaned Properties in Optimizely CMS

Orphaned Properties is an admin tool for Optimizely CMS 12 and CMS 13 that helps teams find and remove properties that no longer exist in code but still remain in the CMS. It gives administrators a faster and safer way to clean up missing properties without relying on repetitive manual checks.

Why orphaned properties happen

When a property is renamed or removed from a content type in code, Optimizely can automatically clean it up only if no data is stored against it. If data still exists, the property is left behind and appears as missing from code.

These missing properties can continue to appear in the admin area, creating clutter and making long-term maintenance harder. In larger solutions, reviewing them one by one becomes time-consuming and easy to miss.

What this tool does

This add-on was built to make that cleanup process easier for administrators.

  • Identify orphaned or missing properties that are no longer defined in code.
  • Review them in one place instead of checking content types individually.
  • Bulk delete outdated properties more efficiently.
  • Reduce the risk of overlooking legacy data during cleanup work.

Installation

Install the package in your Optimizely project with:

dotnet add package A2Z.OrphanedProperties

How to use it

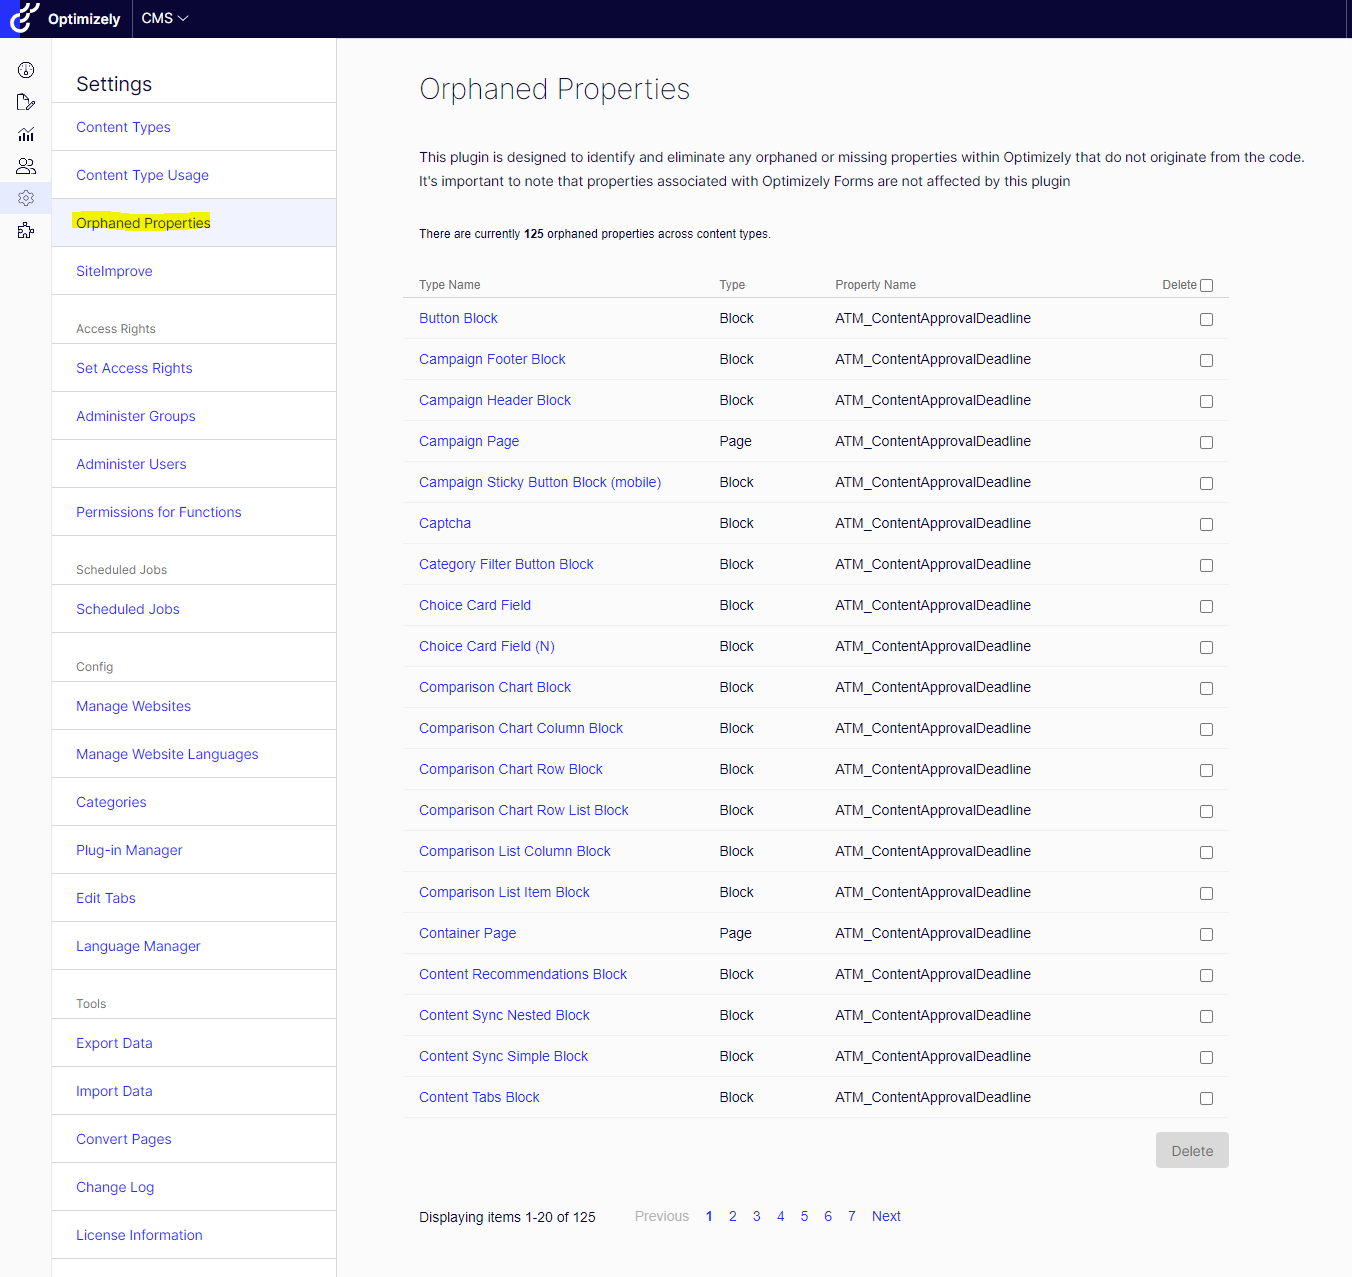
After installation, open Admin > Orphaned Properties to review properties that are missing from code and manage cleanup from one place.

Orphaned Properties tool in Optimizely CMS

When this is useful

  • After refactoring content models.
  • During Optimizely upgrades or solution cleanup work.
  • When removing old properties from pages, blocks, or shared base classes.
  • When auditing legacy data left behind in long-running CMS solutions.

Compatibility

This tool supports Optimizely CMS 12 and CMS 13. Check the package page or GitHub repository for the latest updates and implementation details.

Links

Full documentation and source code:

GitHub repository

NuGet package

FAQ

Does this remove properties automatically?
No. It gives administrators a dedicated place to review and bulk remove orphaned properties more safely.

Who is this tool for?
It is mainly for Optimizely administrators and developers responsible for content model cleanup and long-term CMS maintenance.

April 11, 2024

Tuesday, 23 January 2024

Streamlining Content Translation in Optimizely CMS with Google Translate

A2Z.Episerver.Labs.LanguageManager.GoogleTranslate extends Optimizely CMS with Google Cloud Translation support through EPiServer Labs Language Manager. It gives editors an alternative to the built-in Azure translator and makes it easier to translate multilingual content directly inside the CMS.

Instead of moving content through external tools, editors can use Google Translate from the Language Manager workflow and speed up the first pass of content translation for multilingual sites.

Why use this extension

  • Add Google Translate as a translation provider in Optimizely CMS.
  • Support multilingual editors directly inside Language Manager.
  • Reduce manual copy and paste between external translation tools and the CMS.
  • Speed up content translation workflows for global or multi-market websites.

Installation

Install the package in your Optimizely project with:

dotnet add package A2Z.Episerver.Labs.LanguageManager.GoogleTranslate

Configuration

To use the extension, you need a Google Cloud Translation API key. Google provides setup guidance here:

Google Cloud Translation setup

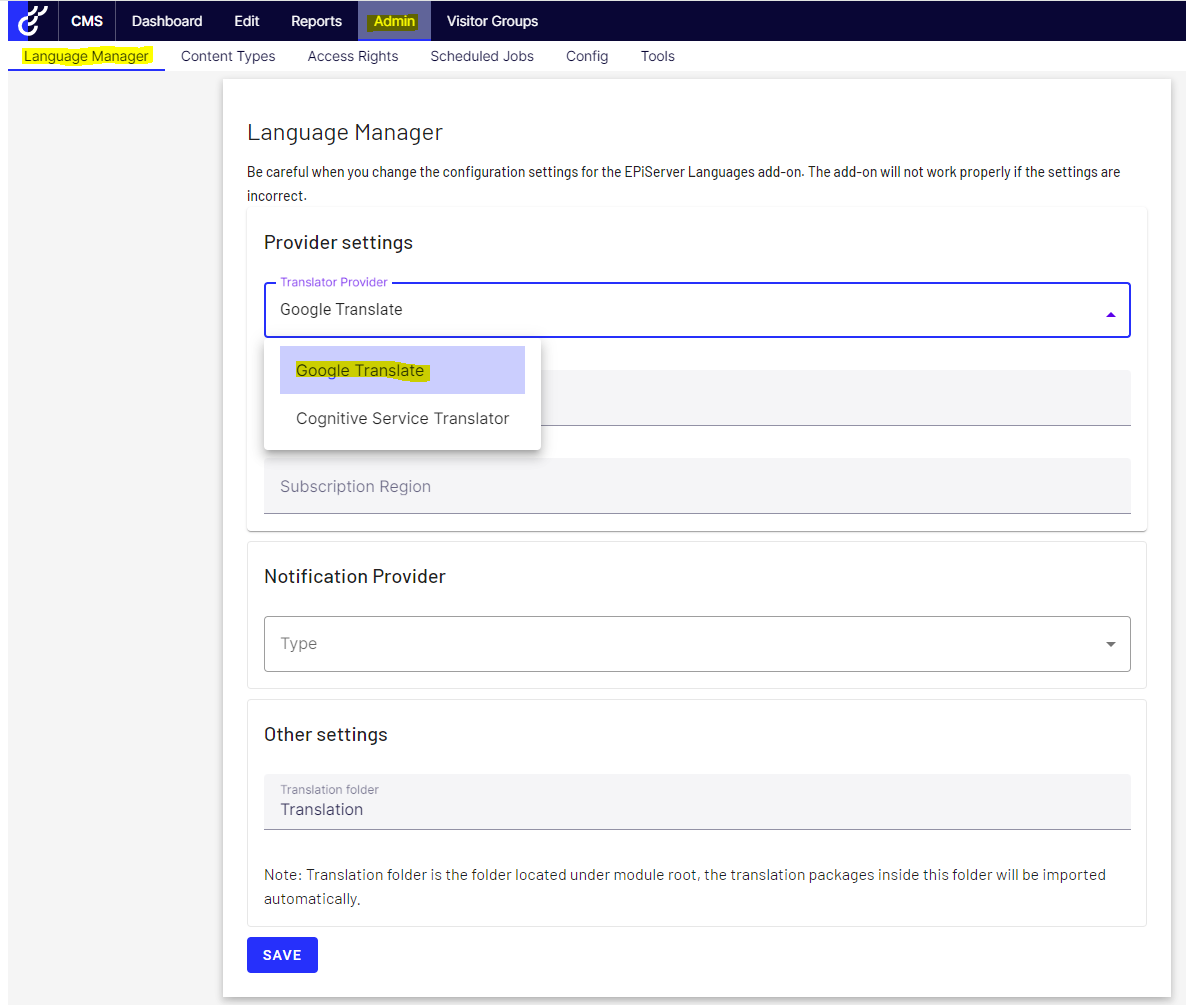
In Optimizely CMS, go to Admin > Config > Tool Settings > Language Manager, choose Google Translate as the translation provider, and enter your subscription key.

For this setup, you do not need to specify a subscription region.

Google Translate selected as translation provider in Optimizely Language Manager

How editors use it

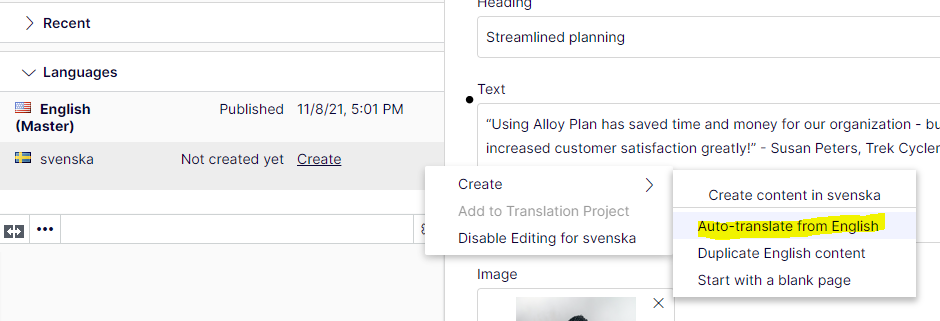
Once the extension is installed and configured, editors can use the Language Manager gadget to translate content more quickly inside the CMS.

Auto translate option in the Optimizely Language Manager gadget

This makes it easier to create translated versions of content without leaving the editorial workflow.

When this is useful

  • When your team prefers Google Translate over Azure for first-pass translation.
  • When editors need faster multilingual publishing workflows.
  • When you want machine translation integrated directly into Optimizely CMS.
  • When managing content across multiple markets or languages.

Compatibility

This extension currently supports Optimizely CMS 12 with EPiServer.Labs.LanguageManager 5.x. Check the package page and repository for the latest version details before using it in newer CMS versions.

Links

GitHub repository
NuGet package

FAQ

Does this replace Language Manager?
No. It extends Language Manager by adding Google Translate as a machine translation provider.

Does it support CMS 13?
As of July 24, 2026, the published package targets Optimizely CMS 12 and Language Manager 5.x.

Why use this instead of Azure Translator?
It gives teams an alternative provider if they prefer Google Cloud Translation for their editorial workflow.

January 23, 2024

Monday, 15 January 2024

SEOBOOST for Optimizely CMS 12

SEOBOOST for Optimizely CMS 12 is a technical SEO add-on designed to give developers and editors more control over canonical links, hreflang alternate links, breadcrumbs, and robots.txt management. It builds on the earlier EPiServer-era version and adds broader support for real-world Optimizely routing and content scenarios.

Last reviewed: July 24, 2026

If you are looking for the older EPiServer-focused article published on May 7, 2019, you can still find it here: SEOBOOST for EPiServer 11.

What SEOBOOST adds

  • robots.txt management through the CMS
  • Canonical link generation with better route handling
  • hreflang alternate links for multilingual and multi-site setups
  • Breadcrumb structured data output
  • Support for simple addresses, partial routing, shortcuts, and trailing slash behavior

What's new in the Optimizely CMS 12 version

This version expands SEOBOOST beyond the earlier EPiServer implementation by supporting more real-world routing scenarios and giving editors more flexibility over technical SEO settings.

robots.txt management

SEOBOOST can expose a CMS-managed robots.txt page type and route, allowing editors to manage crawler directives without changing code.

public void ConfigureServices(IServiceCollection services)
{
    services.AddSeoBoost(x =>
    {
        x.EnableRobotsTxtSupport = true;
    });
}

Canonical links

SEOBOOST supports canonical link generation across scenarios such as:

  • partial routing
  • simple addresses
  • page shortcuts
  • multi-site and multi-domain environments
  • automatic trailing slash handling

You can also specify a custom canonical field in CMS:

public void ConfigureServices(IServiceCollection services)
{
    services.AddSeoBoost(x =>
    {
        x.CustomCanonicalTagFieldName = "CanonicalTag";
    });
}

hreflang alternate links

Like canonical links, SEOBOOST supports alternate link generation with better handling for multilingual and multi-domain Optimizely setups, helping teams create cleaner signals for localized content.

Installation

Install the package with:

dotnet add package SeoBoost

Example configuration

public void ConfigureServices(IServiceCollection services)
{
    services.AddSeoBoost(x =>
    {
        x.CustomCanonicalTagFieldName = "CanonicalTag";
        x.UseSimpleAddressAsPath = true;
        x.EnableRobotsTxtSupport = true;
        x.UseMirrorPageReference = true;
        x.UseSiteUrlAsHost = true;
    });
}

When SEOBOOST is useful

  • When canonical URLs need to reflect real routing behavior
  • When multilingual pages need stronger hreflang output
  • When editors need CMS-managed robots.txt support
  • When technical SEO needs to be handled more consistently across sites

Links

GitHub repository
NuGet package
Legacy EPiServer 11 post

FAQ

Is this the same as the older 2019 SEOBOOST post?
It is the newer Optimizely CMS 12 version with broader features and updated configuration options.

Does SEOBOOST only handle canonical tags?
No. It also supports hreflang alternate links, breadcrumbs, and robots.txt management.

January 15, 2024

Wednesday, 3 January 2024

Advanced Task Manager for Optimizely CMS 12

Update: If you are looking for the newest version of Advanced Task Manager, see the latest update here: What’s New in Advanced Task Manager. If you need the older CMS 11 version, see the legacy post here: Advanced Task Manager for Optimizely CMS 11.

Last reviewed: July 24, 2026

Advanced Task Manager Version 3 was the major CMS 12 release of Advanced Task Manager, rebuilt from the earlier CMS 11 and .NET Framework version for Optimizely CMS 12 and .NET 6. The goal of this release was to give editors and administrators a better way to manage content approval and change approval tasks with a cleaner interface and improved administration tools.

Overview

Advanced Task Manager for Optimizely is designed to improve visibility and control around Awaiting Review tasks in both Content Approval and Change Approval workflows.

Instead of relying on the default task experience alone, editors can work with a more focused administration view that makes approvals easier to review, sort, and process.

What changed in Version 3

Rebuilt for CMS 12 and .NET 6

This release was rewritten for Optimizely CMS 12 and .NET 6, replacing the earlier CMS 11 /.NET Framework implementation with a modern codebase aligned to current platform APIs.

Improved user interface

The CMS 12 release introduced a cleaner and more modern interface, making the task review experience easier for editors and administrators to use day to day.

Better platform alignment

The codebase was refactored to align with newer Optimizely API requirements, helping the tool integrate more cleanly with CMS 12 administration workflows.

Bug fixes and enhancements

Version 3 also included a range of fixes and refinements based on feedback from the earlier version, improving reliability and usability.

Installation

Install the package from the Optimizely NuGet feed:

dotnet add package AdvancedTaskManager

Configuration

Advanced Task Manager can be configured either in Startup.cs or through appsettings.json.

Example service registration:

public void ConfigureServices(IServiceCollection services)
{
    services.AddAdvancedTaskManager(o =>
    {
        o.DeleteChangeApprovalTasks = true; // Default true
        o.PageSize = 10; // Default 30
        o.AddContentApprovalDeadlineProperty = true; // Default false
        o.DeleteContentApprovalDeadlineProperty = true; // Default false
        o.WarningDays = 4; // Default 4
        o.DateTimeFormat = "yyyy-MM-dd HH:mm"; // Default "yyyy-MM-dd HH:mm"
        o.DateTimeFormatUserFriendly = "yyyy-MM-dd HH:mm"; // Default "MMM dd, yyyy, h:mm:ss tt"
    });

    // Or simply:
    services.AddAdvancedTaskManager();
}

Example appsettings.json configuration:

"AdvancedTaskManager": {
  "DeleteChangeApprovalTasks": true,
  "PageSize": 6,
  "AddContentApprovalDeadlineProperty": false,
  "DeleteContentApprovalDeadlineProperty": false,
  "WarningDays": 4,
  "DateTimeFormat": "yyyy-MM-dd HH:mm",
  "DateTimeFormatUserFriendly": "MMM dd, yyyy, h:mm:ss tt"
}

Settings in appsettings.json take precedence over settings defined in startup code.

Admin integration

The tool integrates directly into Optimizely CMS and adds administration pages under the CMS Admin menu as Adv. Task Manager.

Access control

By default, access to the admin UI is limited to administrators. If needed, access can be extended to other roles through the authorization policy during registration.

Example:

services.AddAdvancedTaskManager(o => { },
    policy =>
    {
        policy.RequireRole("MyRole");
    });

Main features

Approve entire approval sequence

Editors can approve the full Content Approval sequence for one or multiple content items, with the comment field already prefilled to make the workflow faster.

Publish after approval

Editors with publish rights can publish selected content immediately after approval, either individually or in bulk.

Deadline field for approvals

An optional deadline field can be added to help editors communicate content urgency before approval.

User notifications linked to tasks

Notifications can be tied more closely to the task workflow, giving editors clearer visibility into approval-related actions.

Task ordering

Awaiting Review tasks can be sorted across multiple columns, giving editors a more usable view of active approvals.

Change Approval details

Change Approval tasks display richer detail, including changes to security settings, moved content, language settings, and expiration settings.

Why this release mattered

This CMS 12 release moved Advanced Task Manager from its older CMS 11 foundation into a modern Optimizely implementation, giving teams a stronger approval management experience on the newer platform.

Links

GitHub repository
NuGet package
Latest 2026 update post
Legacy CMS 11 post

FAQ

Is this the latest version of Advanced Task Manager?
No. This post covers the CMS 12 Version 3 release from January 3, 2024. For the latest update, see the July 21, 2026 post.

What platform does this version support?
This version was released for Optimizely CMS 12 and .NET 6.

What about CMS 11?
The earlier CMS 11 version has its own legacy post and repository.

January 03, 2024

Tuesday, 14 January 2020

Advanced Task Manager: Awaiting Review Gadget for Optimizely CMS

Legacy version: This post covers the original Optimizely CMS 11 version of Advanced Task Manager. For the newer versions, see the CMS 12 release post and the 2026 update post.

Last reviewed: July 24, 2026

Currently, user notifications and Awaiting Review tasks are disconnected and provide only basic information to editors.

Tasks pane

User notification

The idea behind this project is two-fold. First, it builds a more capable approval sequence task management gadget for content approval and change approval tasks. Second, it combines user notifications with tasks so approvers can act from a single interface instead of switching between multiple places.

Advanced Task Manager

The gadget gives editors clearer visibility into each task, including:

  • Content name
  • Approval type, where change approval tasks are available
  • Content type
  • Type
  • Submitted date and time
  • Started by
  • Deadline, if enabled

The main features are:

Some features are disabled by default, but you can enable or disable them through configuration.

Task ordering

The gadget lets editors sort Awaiting Review tasks by:

  • Date and time
  • Approval type
  • Content type
  • Type
  • Category
  • User who submitted the request
  • Deadline

Advanced Task Manager ordering

Deadline field for content approval (Optional)

Deadline field for content approval

The deadline property allows editors to set a priority date and time against content so approvers can see urgency before approval.

The feature is disabled by default and can be enabled by adding the relevant <appSettings> entry to Web.config.

Enable deadline setting

When enabled, the Content approval deadline property is added to page types and block types under the Content Approval tab.

Enable content approval deadline

The deadline property has three states:

  • Warning - highlighted in green when the deadline is approaching. By default, this is within 4 days.
  • Danger - highlighted in red when the deadline has passed.
  • Normal - no special highlighting when there is still enough time.

You can configure the warning duration through Web.config.

Warning notification duration

Setting ATM:EnableContentApprovalDeadline to false hides the property and tab from the CMS editor UI. If you want to remove the property from the CMS, add the delete setting shown below.

Disable deadline setting

Please note that ATM:DeleteContentApprovalDeadlineProperty only runs if ATM:EnableContentApprovalDeadline is set to false.

User notifications associated with the task

User notification with task

The gadget lets user notifications associated with a task be marked as read and makes the notification icon more useful instead of allowing notifications to build up without context.

When editors open or refresh the gadget, unread task notifications are highlighted and then marked as read automatically in the editor notification area.

User notification example

Approve entire approval sequence (only for Content Approval)

The gadget allows the editor to approve the entire content approval sequence for one or more content items. A comment is required.

Approve entire approval sequence

Publish content after approval

If the editor has publish rights, the option to Publish selected content after approval becomes available.

If the editor can publish only some of the approved content, only those items are published, and warning messages are shown for items they cannot publish.

Publish content after approval

Configuring features

To turn individual features on or off, use the relevant <appSettings> entries in Web.config.

Configuring features

Install

Install the package from the Optimizely NuGet feed:

Install-Package AdvancedTaskManager

Then add the Advanced Task Manager gadget to the dashboard.

Advanced Task Manager gadget

Update 2.0.0

  • Change Approval tasks are shown alongside Content Approval tasks.
  • Support was added for more CMS task types, including Optimizely Forms, ImageData, and MediaData.
  • Pagination and performance improvements were included.

Links

Legacy CMS 11 repository
NuGet package
CMS 12 release post
2026 update post

January 14, 2020

Tuesday, 7 May 2019

SEOBOOST for Optimziely CMS: Absolute Canonical, hreflang, and Breadcrumbs

Legacy version: If you are using the newer Optimizely CMS version of SEOBOOST, see the updated post here: SEOBOOST for Optimizely CMS.

Last reviewed: July 24, 2026

SEOBOOST was originally created to improve how Optimizely sites output canonical links, hreflang alternate links, and breadcrumbs. The built-in HTML helpers made implementation easier, but they often rendered relative URLs, while many projects required fully qualified absolute URLs for stronger SEO consistency across multi-domain and multilingual setups.

To solve that gap, I created SEOBOOST as a lightweight open-source helper library for Optimizely. It takes website domain settings into account and generates SEO-friendly output more consistently for sites that need better control over canonical and alternate links.

What SEOBOOST provides

  • Canonical link output
  • hreflang alternate links
  • Breadcrumb structured data support

Why this mattered

Many Optimizely projects needed absolute URLs for canonical and alternate links, especially in multi-site or multilingual environments. That made a small helper library like SEOBOOST useful for improving consistency and reducing repeated custom code.

Usage

Include the namespace at the top of your master page or view:

@using SeoBoost.Helper

For canonical tags, render:

@Html.GetCanonicalLink()

For hreflang alternate links, render:

@Html.GetAlternateLinks()

For breadcrumbs, render:

@Html.GetBreadcrumbItemList()

Legacy platform context

This post refers to the Optimizely 11-era version of SEOBOOST. If you are working on newer Optimizely solutions, the January 15, 2024 article covers the broader SEOBOOST feature set for Optimizely CMS 12.

Links

Updated SEOBOOST for Optimizely CMS 12 post
GitHub repository
Legacy CMS 11 repository
NuGet package

FAQ

Is this the current SEOBOOST version?
No. This post covers the older Optimizely-focused version. The newer Optimizely CMS 12 version is covered in the January 15, 2024 post.

Why use absolute canonical URLs?
Absolute URLs make canonical implementation more explicit and are still recommended by Google for long-term consistency.

May 07, 2019